
The Hidden Treasure Beneath: Our Journey of Pulling Carpet and Restoring Vintage Hardwood Floors
- Jennifer Reyes

- Mar 10, 2025
- 3 min read
Updated: Aug 9, 2025
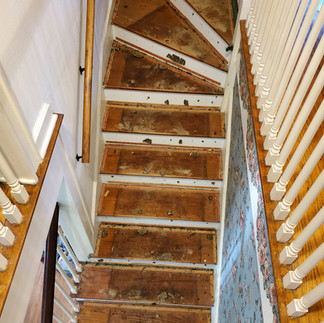
When we first moved into our home, we knew it had history. The creaky stairs, the intricate molding, and the charming imperfections told stories of years gone by. But one thing always seemed out of place, the shag green and beige carpet that covered most of the floors. Shortly after taking possession of the property, we decided to pull the carpet to investigate the condition of the floors beneath. What we discovered was nothing short of a homeowner’s dream: original hardwood floors hidden beneath decades old carpeting.


The Joy of Discovery
With the first tug at the carpet, a sliver of wood peeked through, and our excitement grew. As we continued peeling away the layers, we uncovered beautiful hardwood planks that had been hidden for who knows how long. It was like unearthing a piece of history, a forgotten treasure waiting to shine again. While the floors were scratched, scuffed, and coated in a layer of old adhesive, we knew they had potential. There was only one thing left to do, refinish them. We headed over to our local home improvement store, picked out a stain and some clear coat, and went to work,


The Process of Restoring Vintage Hardwood Floors
Restoring vintage hardwood floors is not a task for the faint of heart, but the results are well worth the effort. Here’s how we transformed our hidden gem into a stunning feature of our home.
1. Removing Carpet and Tack Strips
Once we had all the carpet pulled up, we had to tackle the tack strips and countless staples embedded in the wood. Using a pry bar and pliers, we carefully removed them, ensuring not to damage the delicate wood underneath.
2. Cleaning and Assessing the Condition
Years of being covered meant the floors were layered with dust and remnants of old carpet padding. After a thorough sweep and mop, we assessed the condition of the wood. Some areas had minor stains and scratches, while others had deeper damage that would need extra care.
3. Sanding the Floors
Sanding was the most time consuming part of the project but also the most rewarding. Using a drum sander for the main areas and an edging sander for the corners, we stripped away the old finish and smoothed out imperfections. As the raw wood emerged, we could see the grain and character come to life.


4. Staining (Optional) and Sealing
We debated whether to stain the floors or keep them natural. Ultimately, we chose a warm, medium toned stain that highlighted the wood’s beauty without overpowering its natural charm. Once the stain dried, we applied several coats of polyurethane to protect the floors and give them a rich, polished look.
5. Reveling in the Beauty of the Past
After days of hard work, we finally stood back and admired our newly restored floors. The difference was astounding. The space felt warmer, brighter, and more connected to the home’s original character. Every scuff and knot in the wood told a story, and we were thrilled to have brought it back to life.


A Rewarding Experience
Restoring our hardwood floors was one of the most gratifying home projects we’ve undertaken. Not only did it enhance the beauty of our home, but it also gave us a deeper appreciation for its history. If you suspect hidden hardwood floors beneath your carpet, don’t hesitate peel back a corner and see what’s underneath. You might just discover a hidden treasure waiting to shine once again. Refinishing the floors yourself is a lot of work but is definitely worth it. It not only gives you the satisfaction of doing it yourself, but it can also save you thousands of dollars.
For more information on DIY home and garden projects, recipes and latest finds, please subscribe to my newsletter on the home page of fighollowfarm.com
As always, happy restoring!
Jennifer


Comments